SpringBoot is an opinionated way of building Java applications using SpringBoot framework. Helm is the package manager for Kubernetes an orchestration platform for running containers.
In this article, we will go through building a spring application along with helm charts to run on Kubernetes. This post also elaborates on how to use Helm in SpringBoot application as mentioned in this post.
Pre-Requisites
Please make sure you have the following setup before proceeding :
- helm
- A Kubernetes flavor is accessible, it can either be a local setup via Minikube, Docker Desktop, or even a cloud-based setup using GKE or EKS. This article will mostly focus on using Docker Desktop to demonstrate, but the configuration and the setup should stay the same across all Kubernetes flavors.
- IDE for ease of use. This tutorial uses IntelliJ IDEA to demonstrate.
- kubectl CLI .
- gradle
1. Generate SpringBoot Application
We will create a sample spring boot application using Spring initializer. Intellij has a nice feature to generate within the IDE which can also be used instead of using the CLI interface. Another alternative is to use the Eclipse STS version which should have this plugin to generate spring applications using Spring initializer.
If you would rather skip the creation part just use the recipe from Spring Initializer to create a starter project.
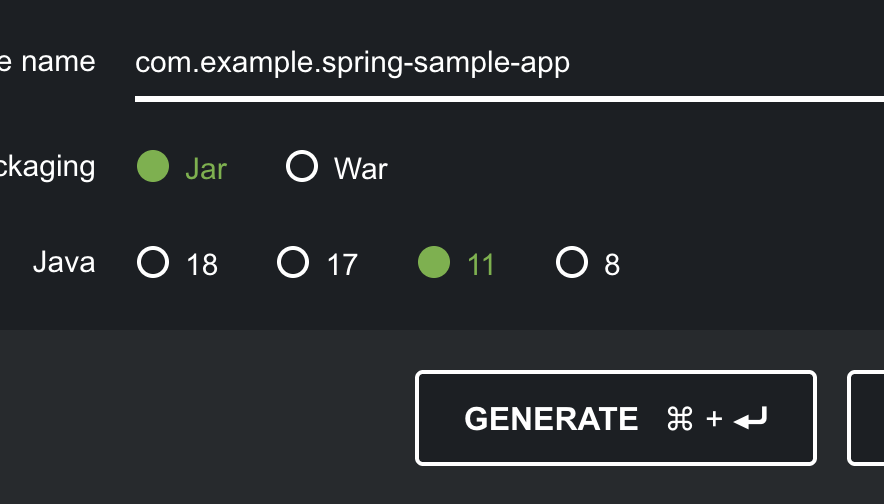
Then click on Generate, this will create the project and download it as zip fileunzip spring-sample-app.zip && cd spring-sample-app/ and replace build.gradle file with the following content
plugins {
    id 'io.spring.dependency-management' version '1.0.12.RELEASE'
    id 'java'
    id 'com.google.cloud.tools.jib' version '3.2.1'
    id 'idea'
}
group = 'com.example'
version = '0.1'
sourceCompatibility = 1.8
repositories {
    mavenCentral()
}
dependencies {
    implementation group: 'org.springframework.boot', name: 'spring-boot-starter-actuator', version: '2.6.3'
    implementation 'org.springframework.boot:spring-boot-starter-web:2.6.3'
    testImplementation 'org.springframework.boot:spring-boot-starter-test:2.6.3'
}
tasks.named('test') {
    useJUnitPlatform()
}
Once done, from within the folder at the same level run the following command, this will generate all the configuration files and launch Intellij IDEgradle openIdea
Click on Load Gradle project which will start downloading all dependencies.
2. Configure SpringBoot Application
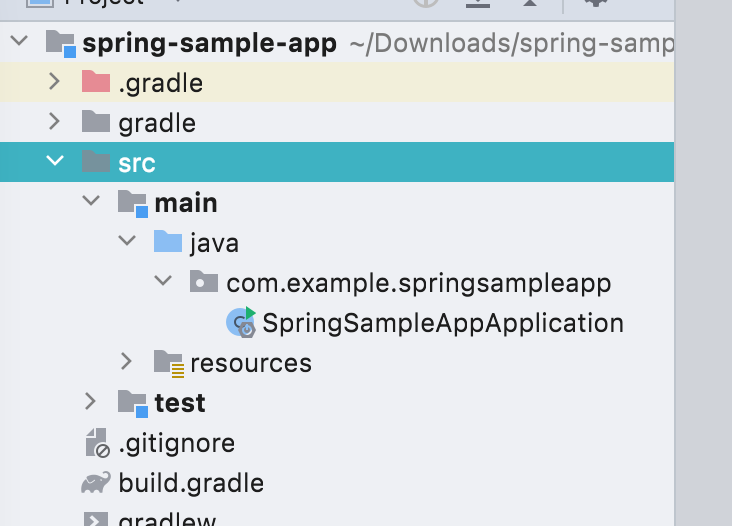
Next, Create the following files in the src directorycom/example/springsampleapp/WebResource.java
package com.example.springsampleapp;
import org.springframework.web.bind.annotation.GetMapping;
import org.springframework.web.bind.annotation.ResponseBody;
import org.springframework.web.bind.annotation.RestController;
@RestController
public class WebResource {
    private AppConfig appConfig;
    public WebResource(AppConfig appConfig){
        this.appConfig = appConfig;
    }
    @GetMapping(value = "/propertyValues")
    public @ResponseBody String getPropertyValues(){
        return String.format("Timeout=%s, Message=%s",appConfig.getTimeout(),appConfig.getMessage());
    }
}
com/example/springsampleapp/AppConfig.java
package com.example.springsampleapp;
import org.springframework.boot.context.properties.ConfigurationProperties;
import org.springframework.context.annotation.Configuration;
@Configuration
@ConfigurationProperties(prefix = "app")
public class AppConfig {
    private String timeout;
    private String message;
    public String getTimeout() {
        return timeout;
    }
    public void setTimeout(String timeout) {
        this.timeout = timeout;
    }
    public String getMessage() {
        return message;
    }
    public void setMessage(String message) {
        this.message = message;
    }
}
Add the following within configmap-reload/src/main/resources/application.properties
app.timeout=1000
app.message=Base Message from the app
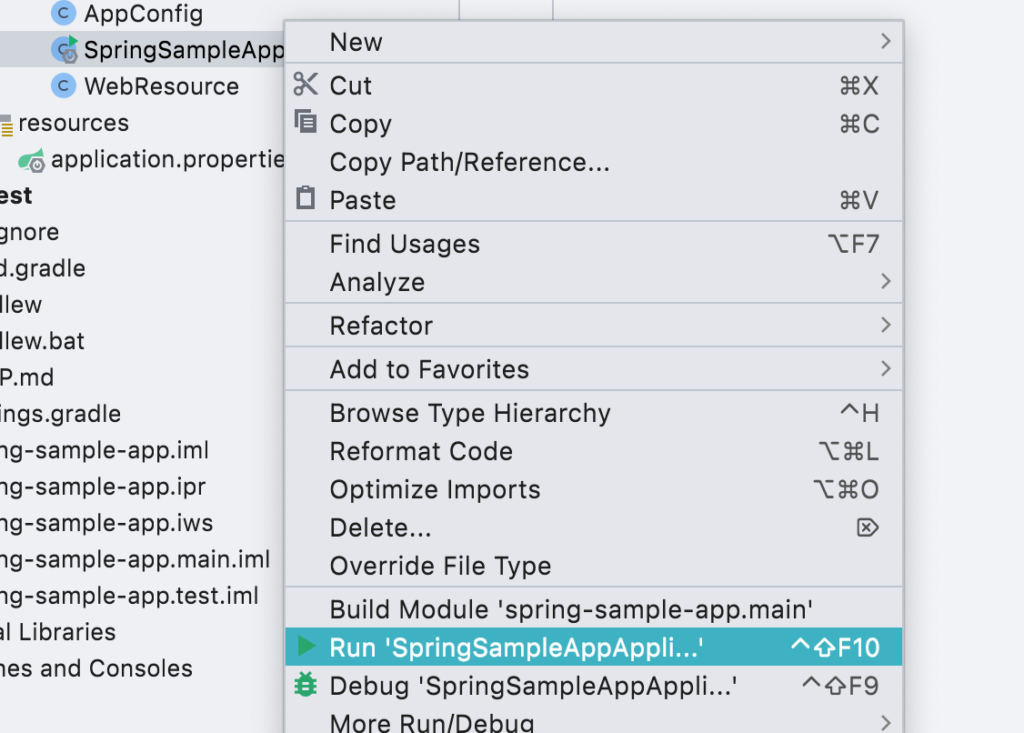
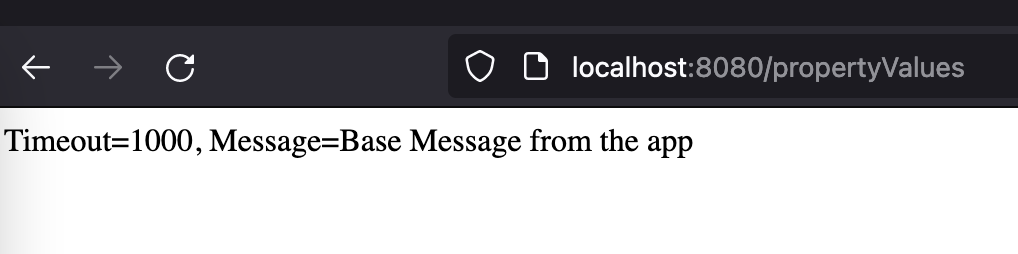
Right click on SpringSampleApplication and Click Run
It should then publish an API that returns property values: http://localhost:8080/propertyValues
You can now stop the application.
3. Create Image and Push to Local Docker Registry
This step creates the image of the spring boot application using Google Cloud Tools Jib, which enables you to push to any docker complaint repository without the need for installing docker itself.
Now run let’s create and push the image to the local docker registry, first make sure Docker is running locally and you can pull images. Start Docker Desktop or Minikube before running this command:docker image ls
The above command should pull images from your local machine or show empty if nothing is installed.
From the root directory of the spring-sample-app run the Gradle command to push the image to the local registry./gradlew jibDockerBuild docker image ls | grep configmap-reload
which should give the following output:configmap-reload 0.0.1-SNAPSHOT 25084953eada
You have now successfully created the application image and upload it to your local docker registry on your computer. Jib is a very powerful tool and can be used for pushing images to many public repositories such as Docker Hub, Amazon ECR, and Google Cloud Repository. Refer to the Jibs documentation for more details.
4. Create and Configure Helm Chart
The next step is to create a helm chart for the above application, you just need to make sure you have helm installed and then follow along.
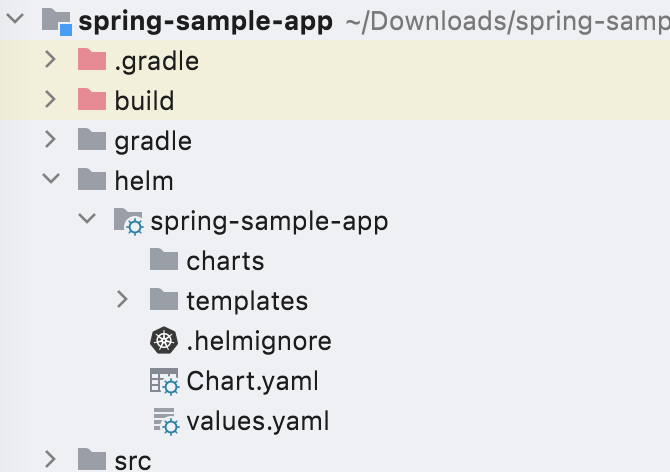
First, let’s create a template chart, the location of the chart can be any directory in your machine, in this example, it is inside the spring-sample-app/helm directory
cd spring-sample-app/helm && helm create spring-sample-app
Now let’s make changes to the values.yaml file for the helm chart to load your application in local k8s. Change the following:
values.yaml file, change the repo name
image:
  repository: spring-sample-app
Also, change the Service Type from ClusterIP to LoadBalancer, this will enable accessing your service as a localhost URL.
service:
  type: LoadBalancer
chart.yaml , change the appVersion
appVersion: 0.1Change the container port from 80 to 8080 within deployment.yamlas that’s the port our spring boot application is configured with by default. Also, change the Liveness and Readiness Probes, these are required by Kubernetes to know if the application is healthy and ready to serve requests.
          ports:
            - name: http
              containerPort: 8080
              protocol: TCP
          livenessProbe:
            httpGet:
              path: /actuator/health
              port: http
          readinessProbe:
            httpGet:
              path: /actuator/health
              port: http
5. Deploy on Local Kubernetes
We are all set to run, navigate within the helm directory and install the chartcd spring-sample-app/helm && helm install spring-sample-app spring-sample-app/
Output:
NAME: spring-sample-app
LAST DEPLOYED: Fri Aug  5 22:21:08 2022
NAMESPACE: default
STATUS: deployed
REVISION: 1
NOTES:
1. Get the application URL by running these commands:
     NOTE: It may take a few minutes for the LoadBalancer IP to be available.
           You can watch the status of by running 'kubectl get --namespace default svc -w spring-sample-app'
  export SERVICE_IP=$(kubectl get svc --namespace default spring-sample-app --template "{{ range (index .status.loadBalancer.ingress 0) }}{{.}}{{ end }}")
  echo http://$SERVICE_IP:80
Ensure that the pod started successfully and the service is live
kubectl get pods
NAME                                 READY   STATUS    RESTARTS   AGE
spring-sample-app-86bfdb9754-xffkq   1/1     Running   0          18s
kubectl get services
NAME                TYPE           CLUSTER-IP       EXTERNAL-IP   PORT(S)        AGE
spring-sample-app   LoadBalancer   10.101.153.142   localhost     80:31381/TCP   56s
The application is running within Kubernetes as a service and should be available at http://localhost/propertyValues
6. Troubleshooting
- If something goes wrong in helm and you want to start over just delete the chart by running
helm delete spring-sample-app - YAML is very sensitive to indentation, so please ensure that the indentation is proper
- Java 17 version at the time of writing this article was not compatible with the latest version of SpringBoot, so ensure you don’t change the spring boot version to a higher than 2.6.3
- if all else fails you can still download the code from the GitHub repo and try comparing it with your setup